CHAPTER 1 – BASIC PROGRAMMING
The concepts and examples used in this section show the basic capabilities of the Event Processor. Many of these concepts will be new to novice MIDI users, and will be explained in detail as we go along.
FILTERING
Filtering is a very basic feature of many MIDI processors. Sometimes, a certain MIDI event or group of events can cause a MIDI device to do unwanted or erratic things, and the only solution is to prevent the event from reaching the device by removing it. A good analogy is the oil filter in an automobile engine: the filter allows certain things to pass through (the oil), but prevents others (dirt, debris). The Event Processor can be programmed to remove certain events from the data it receives.
A very useful example of this is MIDI channel pressure or aftertouch. This feature is provided on many keyboards to make filter, vibrato, or other changes without the need for pedals or a second hand. However, aftertouch creates a lot of MIDI data, and if the receiving device doesn’t respond to aftertouch messages, it might be desirable to remove them from the data stream. Figure 1 shows the programming screen settings required to filter all levels of aftertouch on one MIDI channel.
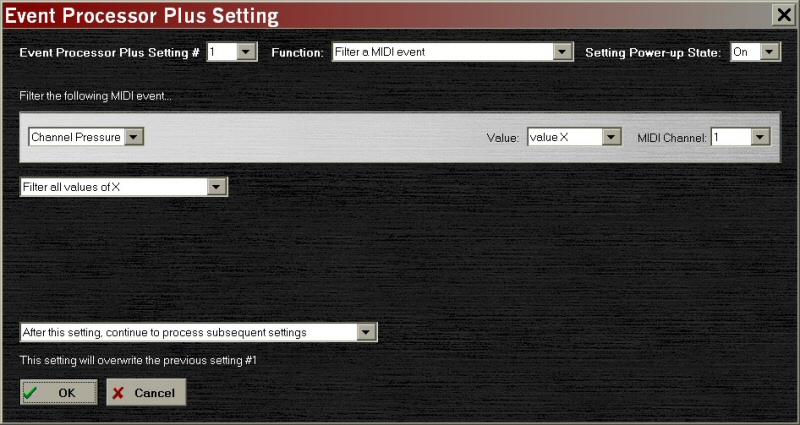
Figure 1 -– Filtering Channel Pressure (Aftertouch)
Please note that we’ve selected to filter all values of pressure in this example. We could instead only filter out some values, leaving a reduced range of data to send to MIDI devices. Please also note that we’ve left the Setting Power-up State and Continue Processing boxes at their default selections. We’ll discuss these settings in the Advanced Programming section.
MAPPING
Mapping is one of the most common reasons for needing a device like the Event Processor. A MIDI device may be able to respond to a certain control, but the sending device can’t send the necessary information. The Event Processor can be programmed to change one event type into a different event; i.e., to ‘map’ the data into another data type.
Let’s consider an example where we would like to change the Mod Wheel into an ‘expression pedal.’ Perhaps we have a piano module that can brighten or darken the tone of the sound through an expression pedal, but our controlling keyboard has no such pedal. Figure 2 shows the programming settings required to convert the Mod Wheel messages to Expression messages.
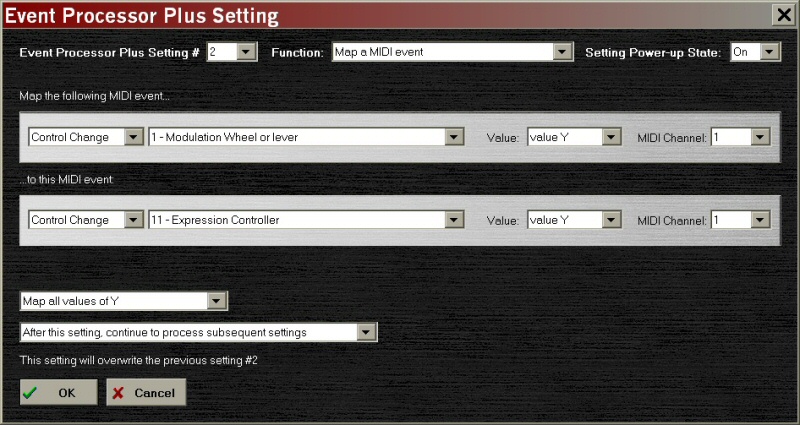
Figure 2 -– Mapping the Mod Wheel to Expression
An important point to remember is that the Event Processor can map one MIDI event into many events. Sometimes, what’s not already in the MIDI data is more important than what is. We could program the device to send Mod Wheel data on Channel 1 to Expression on Channel 1, Foot Pedal data on Channel 2, and Volume data on Channels 3 and 4. Remember, though, that each mapping uses up one Setting in the Event Processor.
Mapping isn’t limited to changing one MIDI channel to another, or one control to another. The Event Processor Can map notes to SysEx messages, standard controllers to NRPN – just about any MIDI event available into another event. In some cases, not all of the information in the original command can be transferred, however, because the two data types use a different number of data bytes. We’ll discuss this again later.
It’s also important to remember that mapping an event replaces the original data, and thus removes the original data from being seen at the output. If the original event needs to remain in place, because we want to add a message rather than replace it, we must also map the original event to it, as shown in Figure 3.
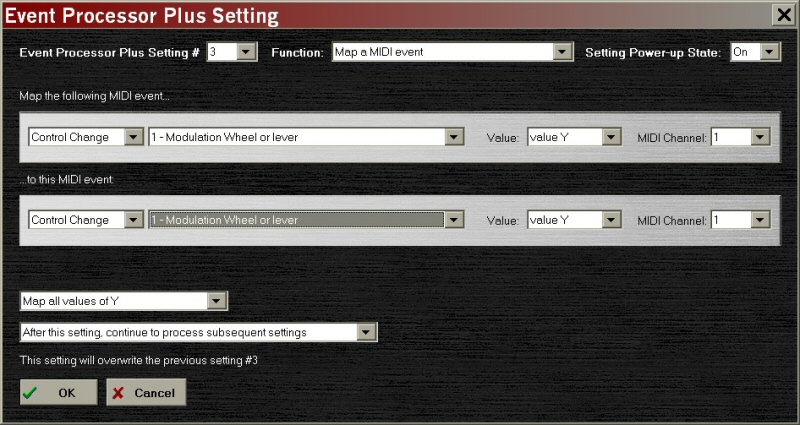
Figure 3 -– Mapping an Event to Itself
TRIGGERING EVENTS
Sometimes we wish to change how a MIDI device works when a certain event crosses a certain threshold. Maybe we want to call up a Middle C on the piano when we push the Expression pedal down, or cue in a bank of lights by hitting a crescendo. The Event Processor can selectively process MIDI data based on a 'trip point.' For our next example, let’s say that we have a spare volume/expression pedal lying around, and we want to control the speed of our MIDI organ module’s rotating speaker (you know the name) simulator. Using the Trigger function, the Event Processor can be programmed to send one event when the pedal crosses a certain threshold, and a different event when the pedal crosses back. This turns the Expression pedal into a speed switch, and it doesn’t require hitting an exact value; as long as the pedal sends a value above or below the threshold, the events will be triggered.
Figures 4 and 5 show how this can be done. In Setting #4, we trigger slow speed on incoming values of Expression (CC#11) 63 and below, and in Setting #5 we trigger fast speed on values 64 and above. Now we have a pedal that calls up slow speed when we pull back on it, and changes to fast speed when we push it down.
Note that unlike mapping, triggering does not filter out the original event: Expression data is still being sent to the rest of the MIDI chain.

Figure 4 -– Triggering Slow Speed
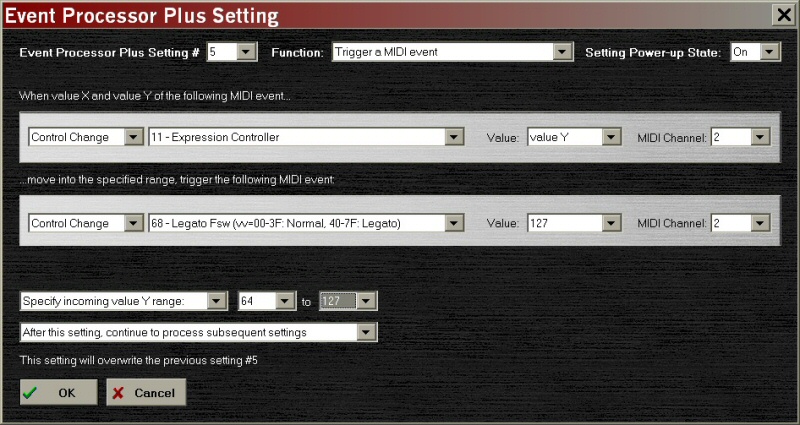
Figure 5 -– Triggering Fast Speed
Another very important point to remember is that once a MIDI event is seen that is inside the trigger range of the Setting, the event will cause the Setting to "fire"; in order to be able to trigger again, another MIDI event outside the Setting range must be seen to "reload" the Setting. If Setting #4 used the range 0-127, the Setting would trigger the first time that an Expression event was seen, and then never trigger again.
One additional thing that we might want to consider is that the above example creates a very ‘tight’ speed control switch. If we were to sit with our foot on the pedal very close to the mid-point, tiny movements would send a slew of speed control changes. This is probably not a good thing! To prevent this problem, we could change the trigger ranges to say, 0-40 for slow speed and 90-127 for fast speed. This would result in a pedal that must be deliberately pushed toward fast or slow speed to react.
DEFINING SEQUENCES
Sometimes, we might want to alternate through two (or more) patterns with our trigger event. Let’s modify our previous example to use the Sustain pedal to change the rotating speed. Unfortunately, the Sustain pedal is a ‘momentary’ switch, which sends one CC value when pressed and a different value when released. This results in a speed control that favors one speed over the other; the player must keep a foot on the pedal at all times to choose the "other" speed. Some players might like this method, but most of us grew up playing organs that changed rotating speed only on command. We’d rather tap the pedal once to change speeds, and then have the speed remain steady until the pedal is tapped again. Using the Define Sequence function, we can turn the sustain pedal from a momentary switch to an on/off switch.
To create this pattern, we need three Settings: the first one sets up the sequence; the remaining two Settings define the actions that occur in each step of the sequence. Figures 6-8 show these Settings.
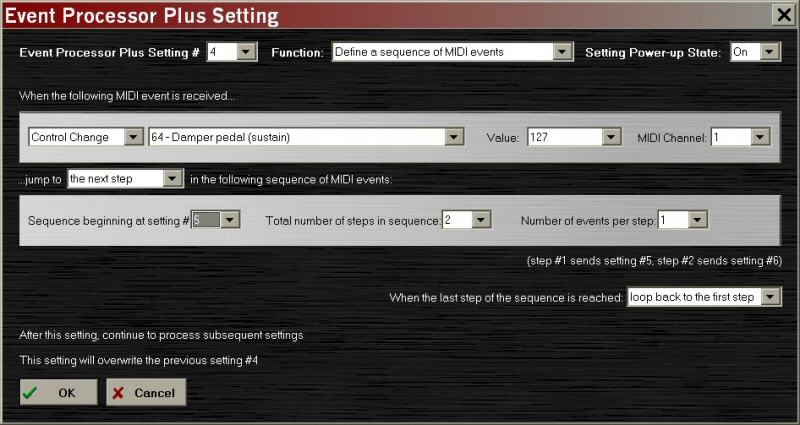
Figure 6 -– Defining the Sequence
Please note that there are many variations to sequencing not demonstrated in this simple example. We can define a sequence with more than two steps; each step can have several Settings; and a sequence can stop after running once, or loop forever. The only limitation is that each step of the sequence must be the same length (one Setting, two Settings, etc.). If a need arises to send unequal steps, the short step must be padded with empty Settings so that all of the steps are equal.
Note: At the start of a program, all Settings are empty. Any Settings that aren’t defined in the Programming Tools remain empty when the Event Processor is programmed.

Figure 7 -– First Step (Fast Speed)
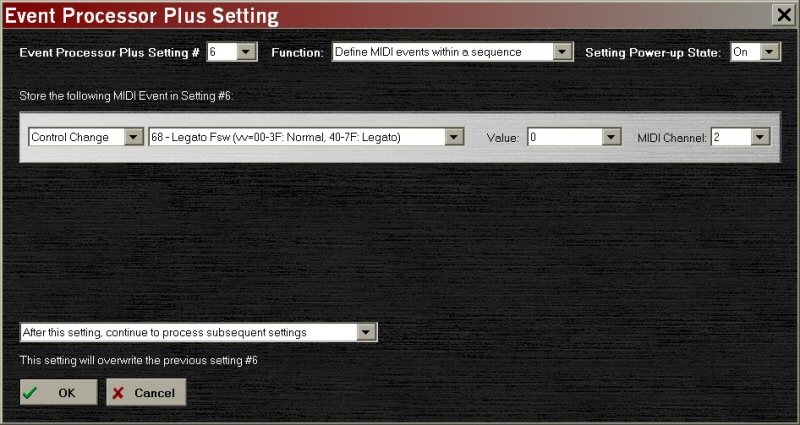
Figure 8 -– Second Step (Slow Speed)
TURNING A SETTING ON AND OFF
Sometimes, it’s useful to enable and disable some of the Event Processor’s abilities based on other Events. For example, let’s say that we want to map a portion of our digital piano keyboard as a zone to control an external module for left-hand bass -– except that we don’t want to always give up this section, because having 88 keys to play piano is useful, too. If our piano were a MIDI master keyboard, we would just press a couple of Zone buttons and split the keyboard on demand. But, our piano isn’t that complex.
Fortunately, our digital piano has Pitch and Mod wheels. We could map the Mod Wheel to control the zones: When the wheel is less than halfway on, the piano controls the entire keyboard; when it’s more than halfway on, the bass line takes over some of the keys. Figures 9 and 10 show how this can be accomplished: Setting #9 does the actual zone mapping, while Setting #6 turns the other Setting on or off based on the position of the Mod Wheel.
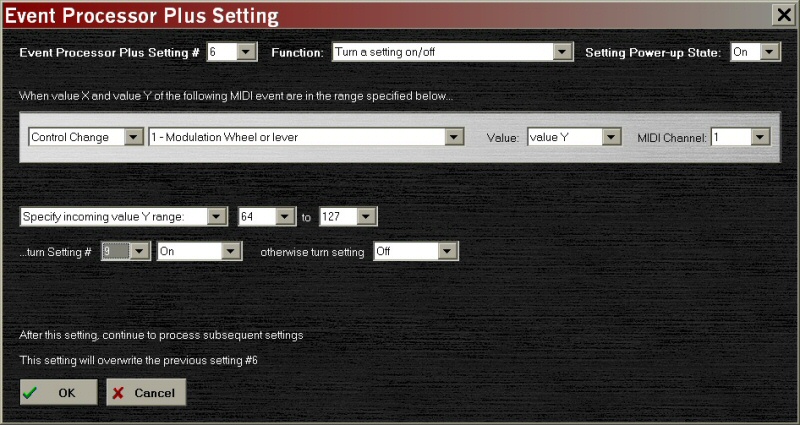
Figure 9 -– Turning a Setting On/Off
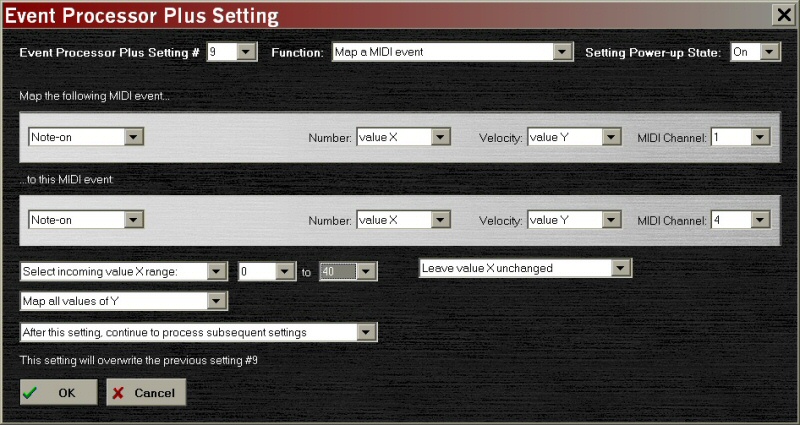
Figure 10 -– Mapping the Bass Keys through the Mod Wheel
There is one problem here: If we play a note, move the Mod Wheel, then release the note, the note off (technically, Note On with velocity=0) will be sent on the new channel, rather than the old one. Unless we’re looking for a drone effect, this is a bad situation. We need two more Settings which trigger All Notes Off messages on Channel 1 and 4 when the Mod Wheel moves in or out of the range that changes the channel. Figure 11 shows the first of these two Settings.
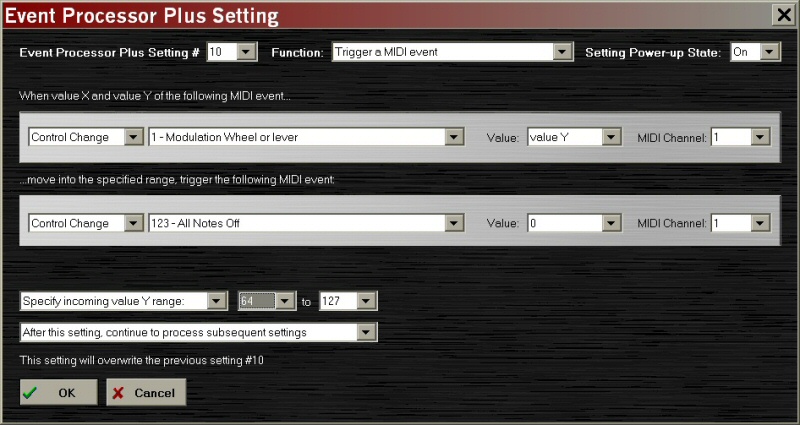
Figure 11 -– Sending an All Notes Off Command to Prevent Stuck Notes
OK, we’ve now gone through all of the simple functions of the Event Processor. For many users, this is the end of the line –- for now at least -– and you can move off to programming the device with the Settings needed for your particular setup. Some MIDI Solutions customers use their devices to answer a single problem.Some of you, however, may want the Event Processor to help in a more complicated setup, or change your MIDI setup frequently, or just want to understand what your device will be able to do if your setup becomes more complicated over time. The Event Processor’s settings can be used to provide more complex changes in the function of MIDI gear than would appear and first glance. This brings us to ...
Previous Chapter
Next Chapter
Copyright © 2025 by Ashby Solutions. Used with permission by MIDI Solutions, Inc. This document may be freely copied and distributed in whole; sections of the document may not be used for other purposes without expressed written permission from Ashby Solutions. MIDI Solutions, the Event Processor, and the Event Processor Plus are trademarks of MIDI Solutions, Inc. of Vancouver, BC, Canada. Ashby Solutions and the Ashby Solutions logo are trademarks of Ashby Solutions of Ashby, MA, USA. All rights reserved.
Products | FAQs | Support | About | Order

Copyright © 2025 MIDI Solutions Inc.